Dolphin{anty} Script Builder Guide
Blog » Dolphin{anty} Script Builder Guide
You’ve probably heard about our new feature, the Script Builder. And if you’re reading this article, you probably want to start using it. And we’re here to help! It’s time to learn more about this useful tool and start using it in your daily work.
What is the automation of actions in the browser
Browser automation refers to the process of using software tools or programs to perform tasks and actions in a web browser automatically by emulating human behavior.
There are several reasons to automate browser actions. For example, it can help save time and increase efficiency when performing repetitive tasks online, such as filling out forms or navigating through multiple pages.
Why do I need to emulate user actions in the browser?
Browser emulation is a useful technique for automating tasks and optimizing workflows. Emulation of user actions in the browser can be useful for several reasons:
- Time savings. Automating tasks saves time and allows you to delegate routine tasks to a robot. For example, you can automate the process of logging into a site and filling out a form, which can take a long time if done manually.
- Increased efficiency. Automating tasks improves accuracy and reduces the risk of errors that can occur with manual data entry. This is especially important when dealing with large amounts of information online or complex workflows.3
- Scale operations. When you automate, it’s easier to scale operations, allowing you to perform repetitive tasks quickly and efficiently. This can be useful in scenarios such as web scraping or social media marketing.
- Consistency. Automation gives you the assurance that tasks will be performed consistently every time. This is important for tasks such as testing and quality assurance, where sequencing is important.
- User action emulation can be used to collect data from websites and other Internet resources by automatically navigating through pages and extracting information by simulating the user’s work. This can be useful for tasks such as data analysis or market research.
What is the Scenario Builder?
Scenario Builder is an automation of actions in the browser that you can create with an interactive map. It clearly shows the actions that will be performed. Imagine every click, button press, login/password entry, and other actions you perform in the browser. You can delegate all this work to a script designer. All you need to do is write a script – a sequence of actions, which robot will use to perform your tasks. Seems complicated? Let’s look at an example!
You want the robot to take some action on all your FB accounts (and there could be any number of them). Let it be a confirmation of card linking. If you were to do it manually, the task would take hours. You have to enter each profile, perform a series of actions, and exit. If there are a lot of accounts, this becomes a real problem. With the script builder, you can make a simple script that will do this for you, even when you’re asleep.
The functionality of the script you write is limited only by your imagination. With Dolphin{anty} browser automation, you can delegate everything you do daily by hand to a robot.
How is the script builder better than macros for the browser?
The Script Builder is generally considered better than macros for browser automation because it has a number of advantages. One of the main drawbacks of macros is that they are inflexible and can only perform a limited set of actions, including the inability to handle errors and glitches that may occur during automation.
In contrast, the Script Builder provides more flexibility and customizability in automating actions in the browser. It allows for more efficient error handling. Users can create additional scripts to handle failures and exceptions that may arise during the automation process.
Another benefit of the script builder is the ability to have more control over accounts, since it has no restrictions on linking macros to specific account IDs or user interfaces. This makes it easier to automate tasks for multiple accounts without having to write separate macros for each account.
Getting to know the constructor
Our scripts are based on the routine activities that users do every day at their computer and spend a lot of time doing. To do this work, you need to build a chain of “actions” that will be performed in your browser window.
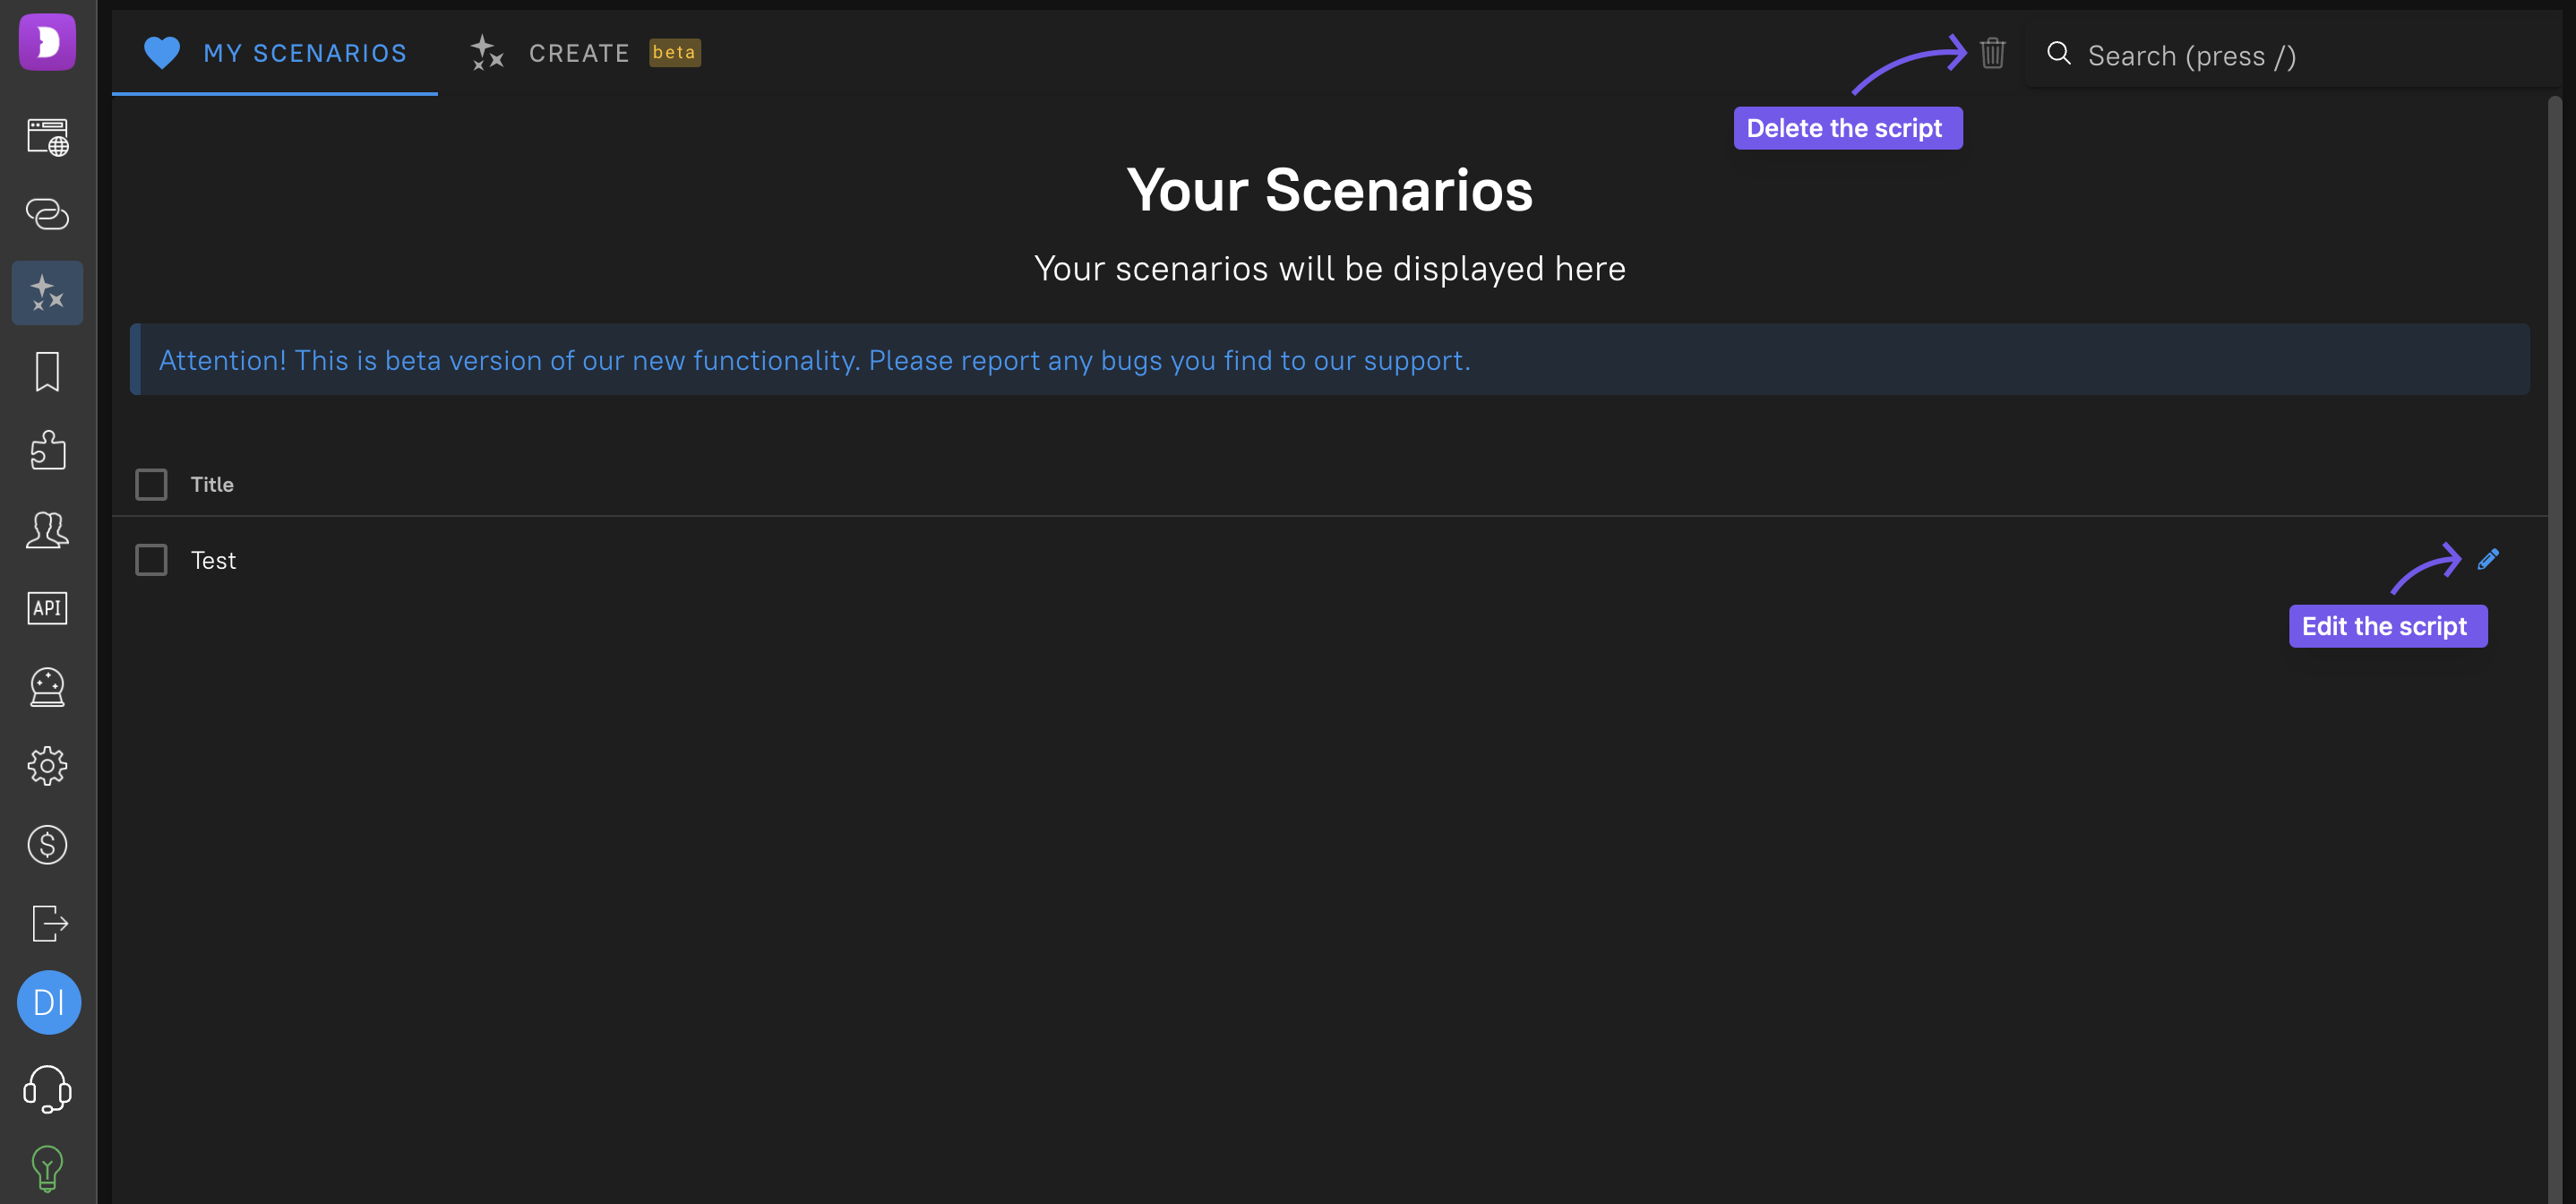
To get to work, select the “Scripts” tab by clicking on the icon in the left menu.
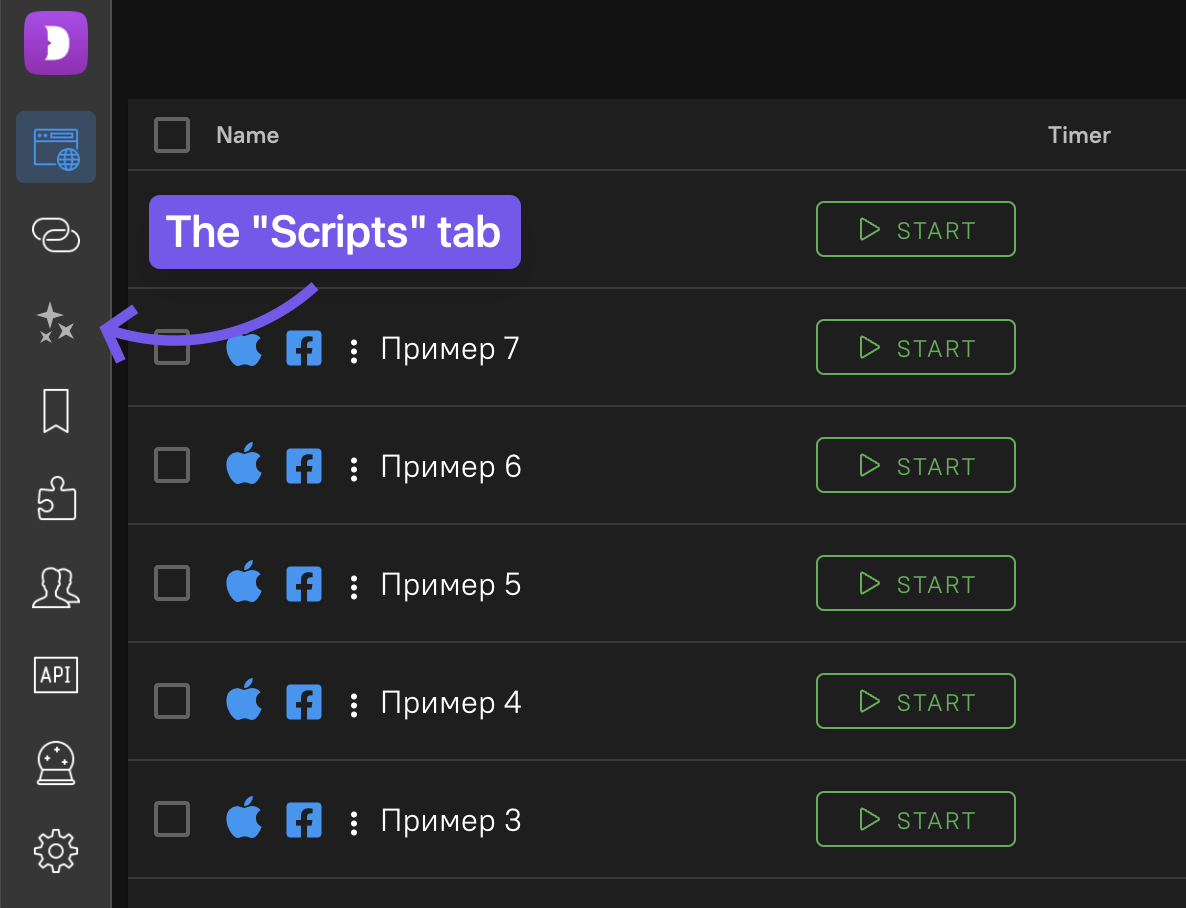
Here the program immediately prompts us to create our first scenario.
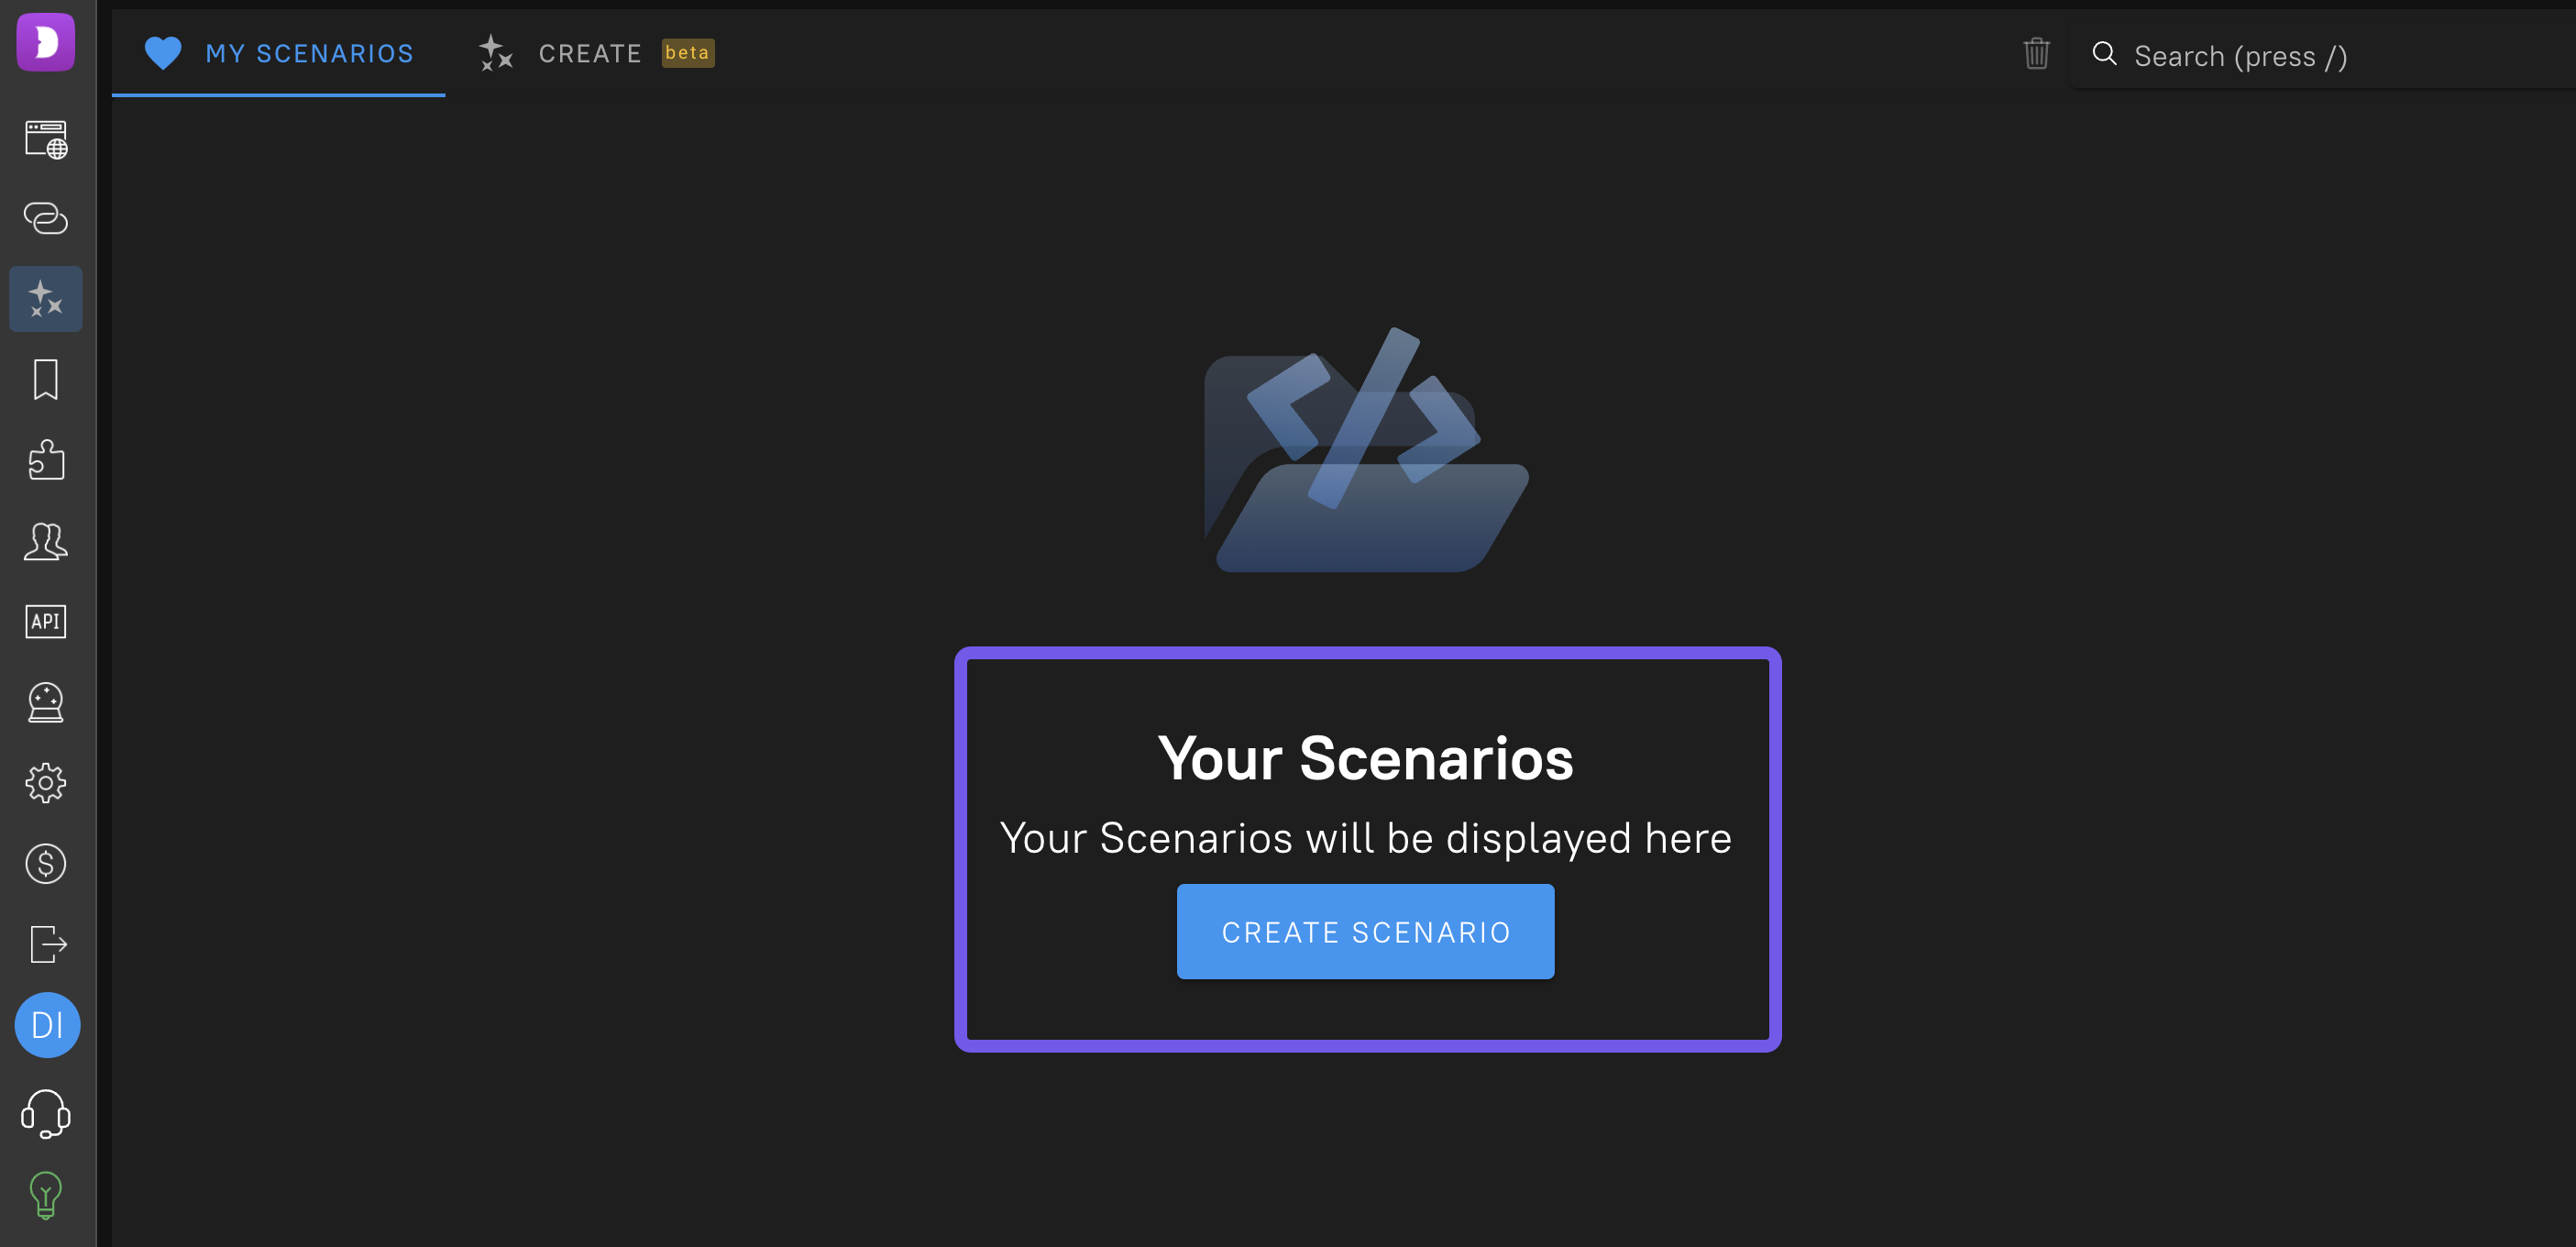
Also, this window will display all your scripts, you can delete or edit them.
After creating a script, a workspace opens up for us to create a script.
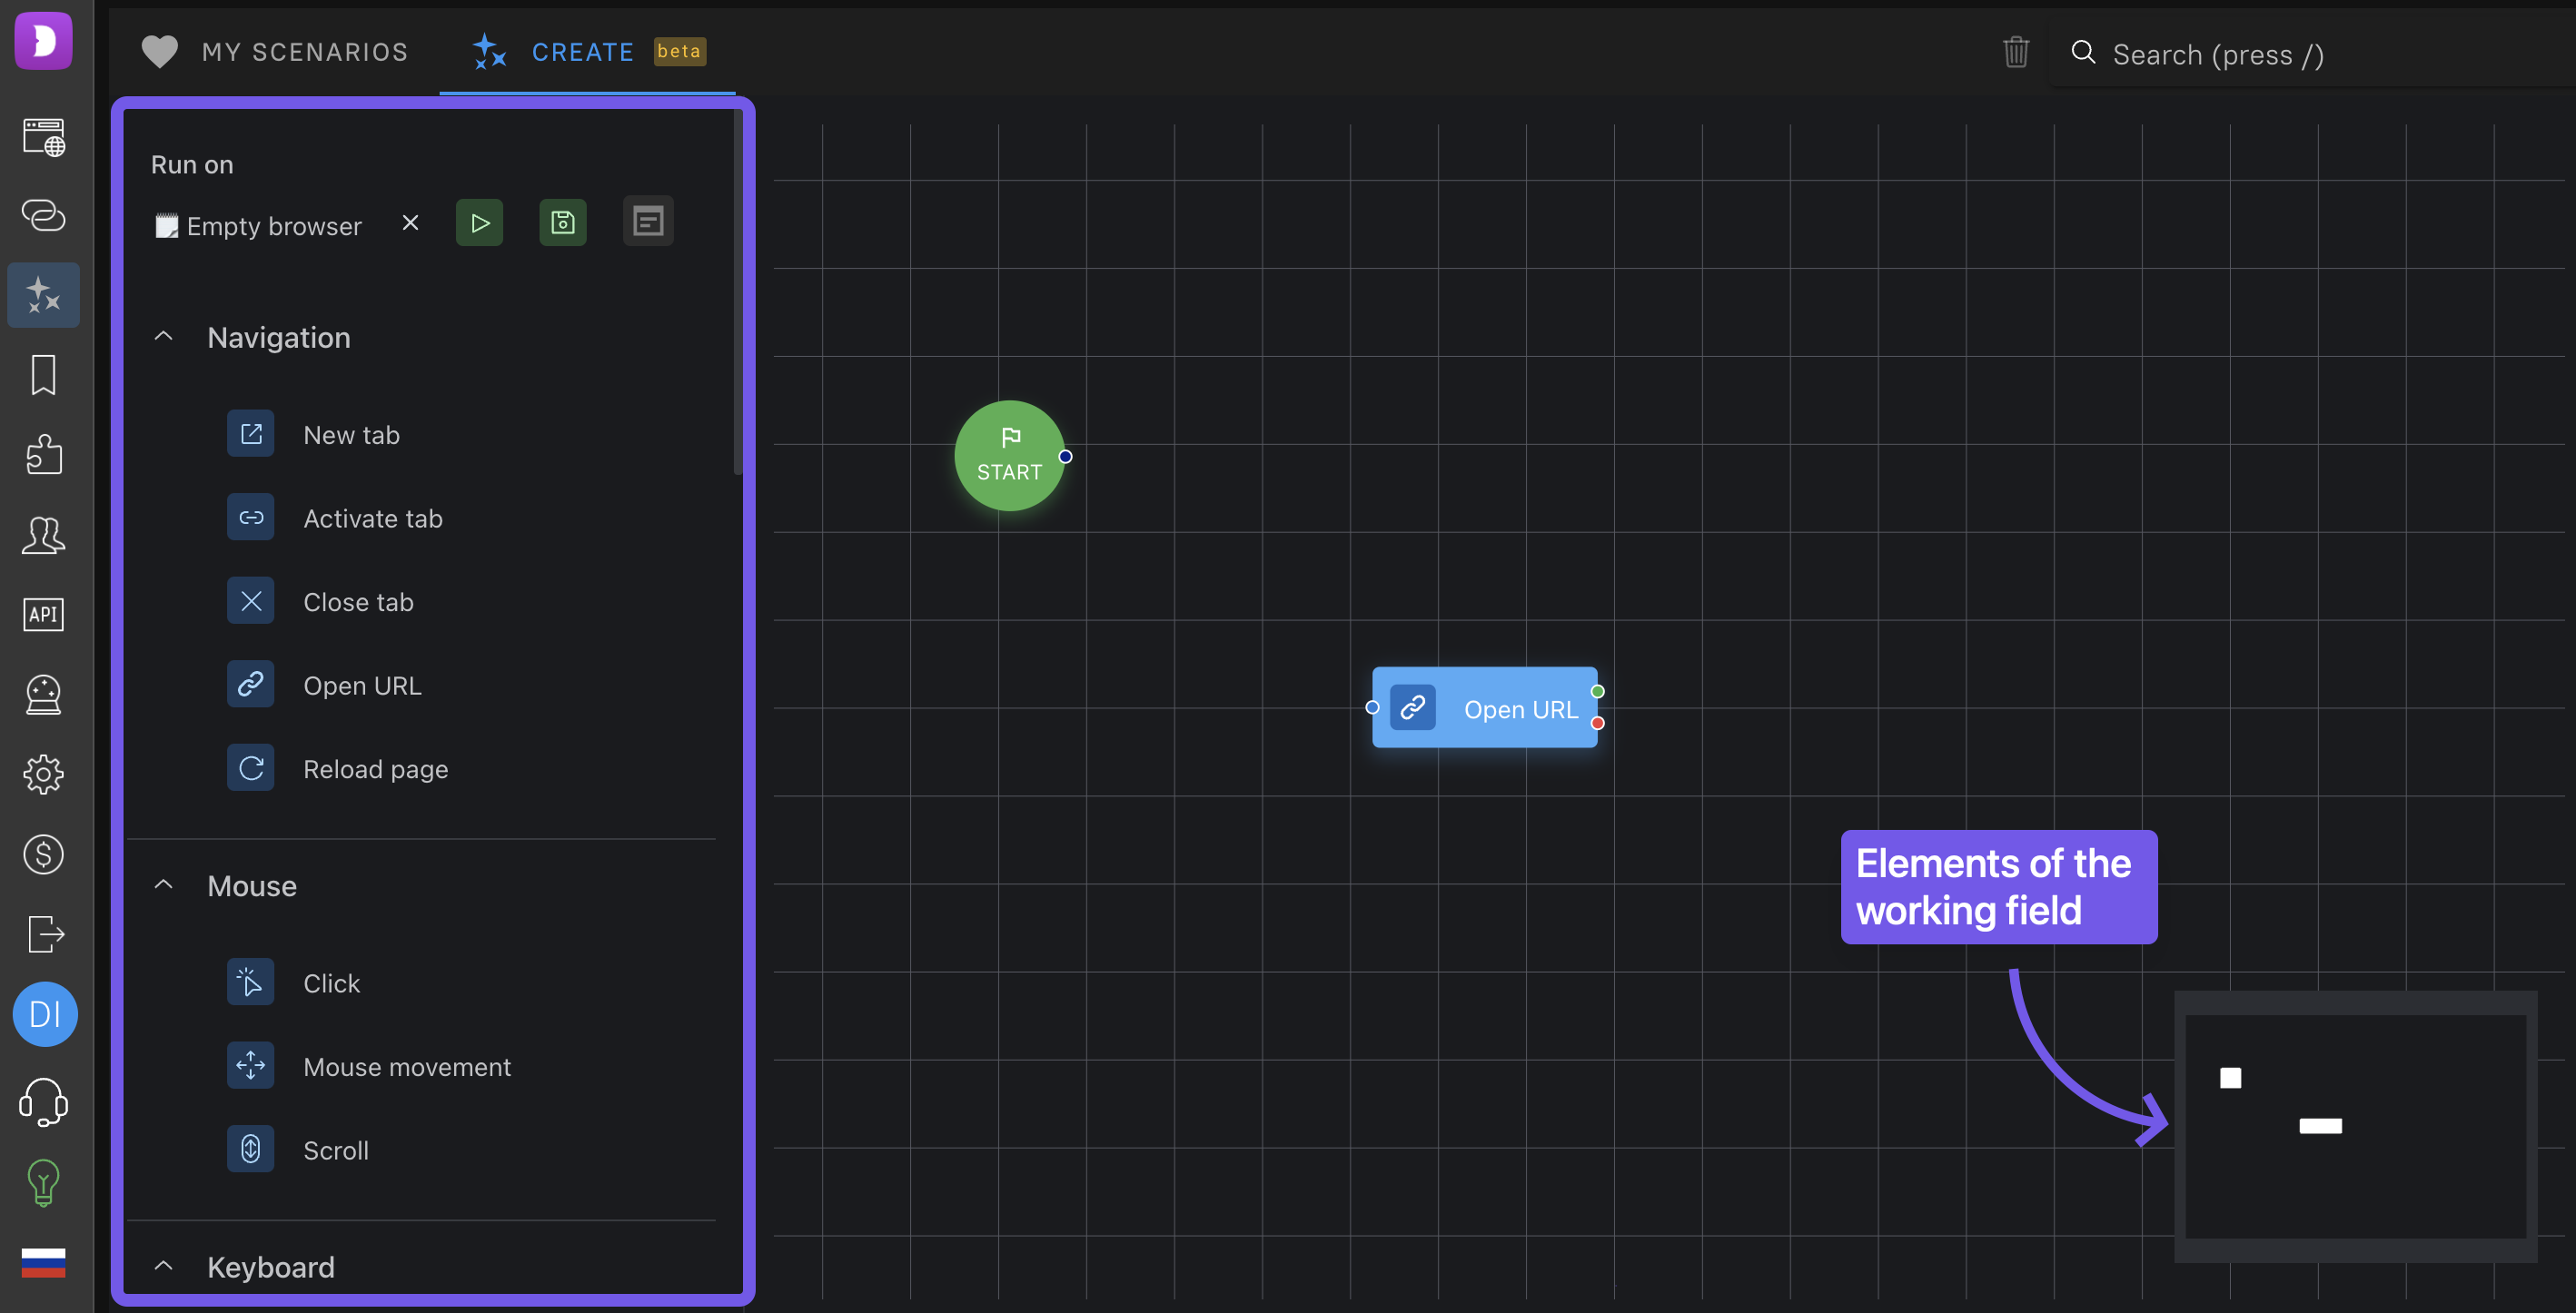
What we reflect in our tab:
– Working Field
– Map of the working field
– Action blocks.
Deletion of any action (For example: close tab) occurs after selecting the action on the field or selecting all items by pressing Shft + select item, then press Del on the keyboard to delete.
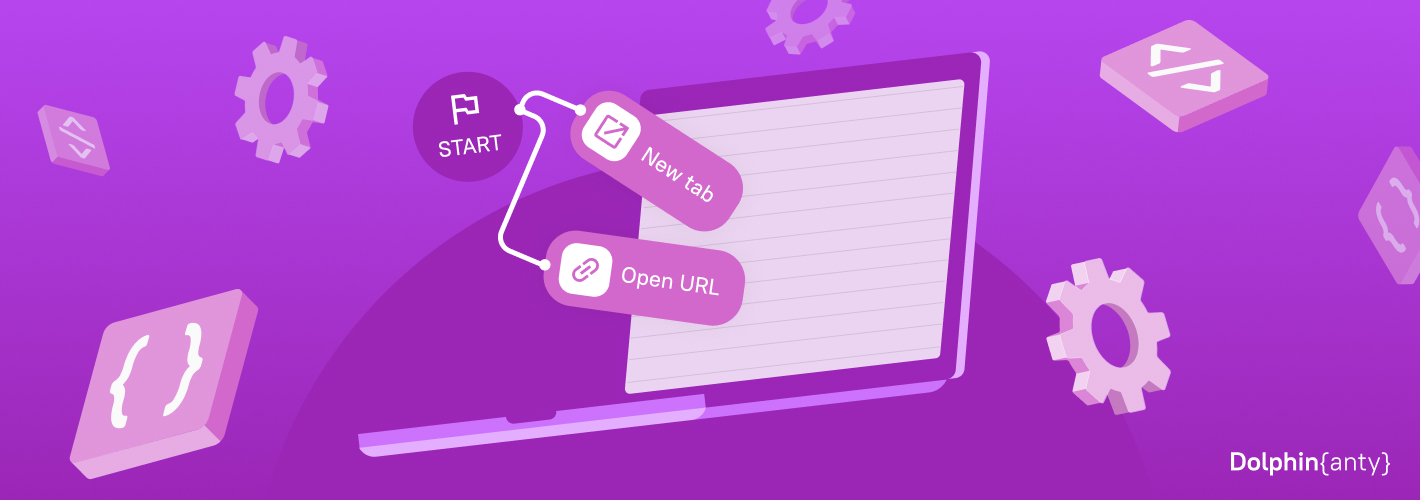
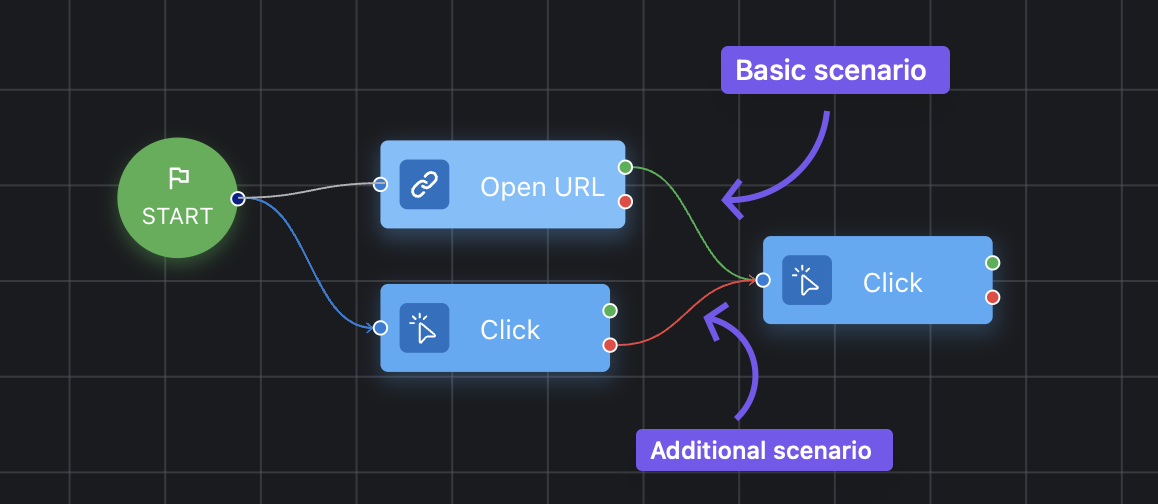
To get started, you connect the first block to the green “Start” circle. This lets the script know where the starting point of the process begins.
All actions must be connected by a “Thread” so that the constructor can understand the sequence of actions.
The red thread gives you a choice. It sets another action in case the green thread didn’t work or there was a glitch on the site and the button the bot should have pressed didn’t appear. Then the bot will follow the red thread, which will bring it to a certain block, which will send you a notification in Telegram.
System variables
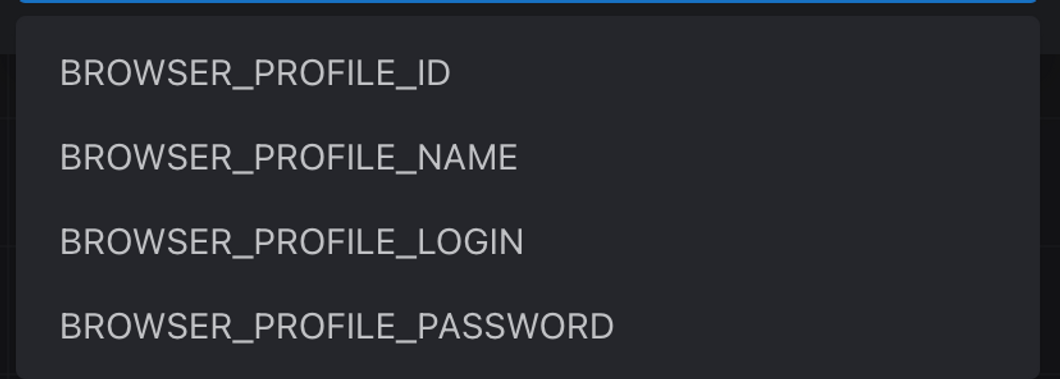
Some action blocks use system variables with browser profile parameters as input variables. This is necessary for mass logins to major working social networks or, for example, to build scripts that will interact not only within the browser, but can also be used between profiles. System variables cannot be overwritten and cannot be used as output variables.
- Browser_profile_id – system profile ID.
- Browser_profile_name – Profile name.
- Browser_profile_login and Browser_profile_password – if the profile type Facebook, Google or Tiktok is selected, it saves login and password from these fields into separate variables.
Now let’s break down the blocks into categories.
Table of contents
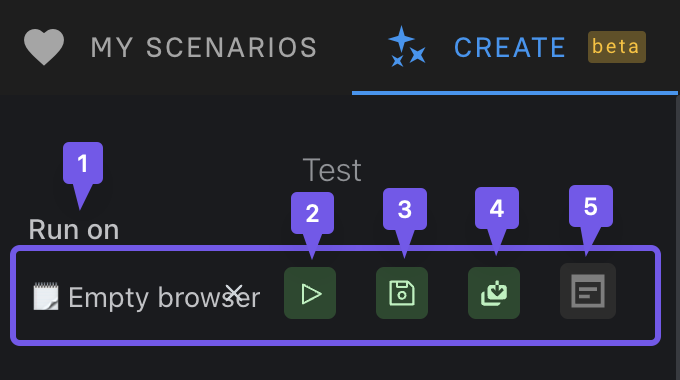
1. Selecting a profile on which you can immediately apply our script. When selecting an “empty” profile, a new temporary profile will be created where you can test the scenario (the profile is not saved anywhere, it is only needed for the test and uses the ip of your PC). You can also run the ready script on multiple profiles in the “Browsers” tab.
2. Running the script on the selected profile.
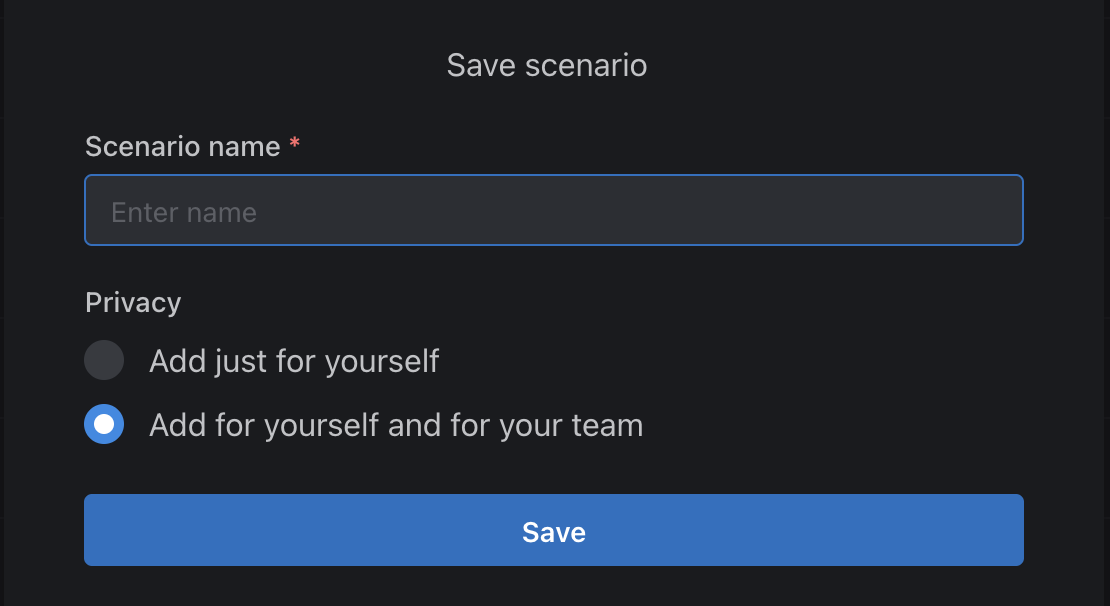
3. Save the created scenario.
4. Save as. Allows you to save a separate script with a new name at the moment of work.
You can also set the level of privacy of the created scenario. You can choose to whom a particular scenario will be visible: only you or the whole team.
5. Logs – shows the logs after running a script on the profile in the scripts tab.
Navigation Block
Navigation is your interactions with web pages in general: open or refresh a page, go to a specific URL, or switch to a tab. All of the things you do in the address bar can be automated. For example, your first action in the browser is to open a certain web page. All you have to do is type in the URL, and a robot will open it for you.
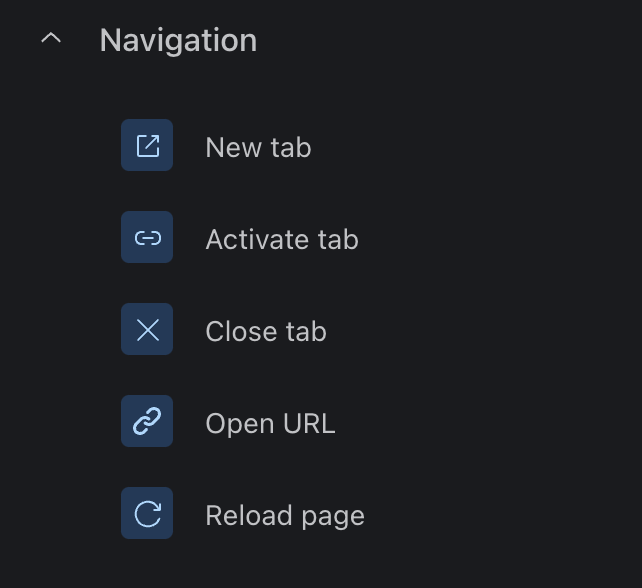
Let’s analyze the main elements of the Navigation block and their functions:
- New tab. Here you need to enter the URL that the constructor should open. This block supports a modifiable resource, read more about it below.
- Activate tab. Selects the tab that you specify to switch to work in it.
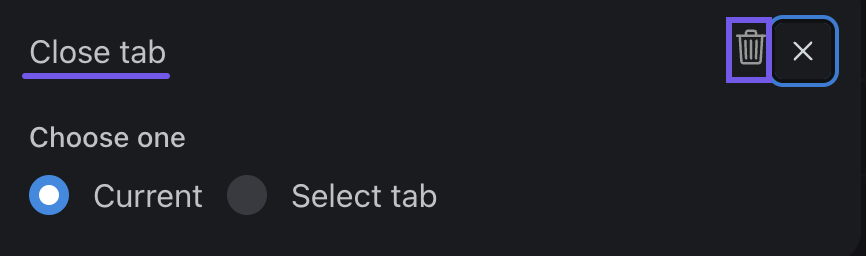
- Close tab. You can close both the current tab and specify the number of the tab to be closed.
- Open URL. Starts the specified URL on the open tab.
- Refresh page. Refreshes the page on the pre-specified tab.
Variable resource
A handy tool for working in a team. Allows the creator of a script to specify an action in an item for each participant in the script. This can be done when saving and sharing.
Block Mouse
All the actions of this block, designed to copy your mouse movements as identically as possible. Clicking a certain button, scrolling to the necessary element of the web page – easy! Just set the necessary parameters and it does everything for you. For example, after opening a web page, you click on a certain field / button to enter parameters. All you have to do is specify the coordinates or a page element for the bot to click.
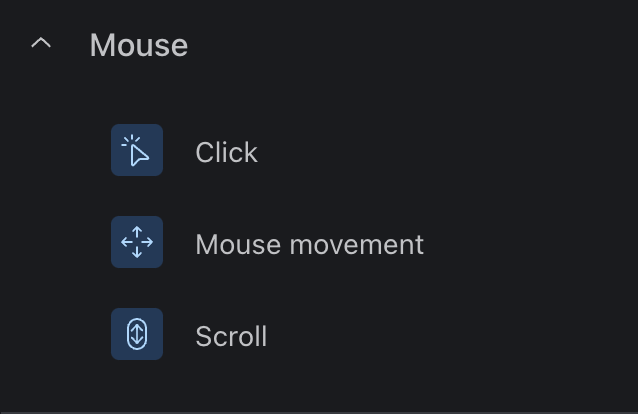
- Click – imitation mouse click
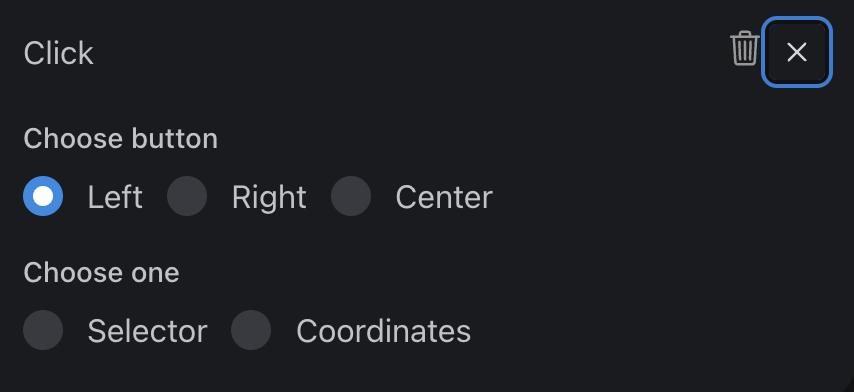
In this block you can:
– Select the buttons that the bot will use;
– Specify the selector to use or the coordinates of the Selector.
There are 3 types of selectors:
1) XPath allows you to search by any attribute of an element at all. Developers often add their own attributes to many tags. You can use it for example for: DOM tree search, blog post author selector, table search.
XPath handles things where others fail.
Tables are quite common on web pages. It’s not uncommon to have multiple tables on one page, and each table can contain hundreds of rows. How do you make a selector to a cell’s “On Approval” link? Classes are left somewhere on top, tags are all the same, and there are no attributes at all. XPath does a great job here, thanks to its features and full-text search:
//[contains(.,’Deals’)]//td[contains(.,’On Approval’)]//a
Such a selector is easy to read, so it is easy to make edits to it if necessary.
By the way, here XPath shows additional flexibility. If in the “On Approval” example above there is a whole set of “Procurement”, we can add the procurement number as another condition. For example, like this:
//*[contains(.,’Deals’)]//tr[contains(.,’Procurement 4′)]//td[contains(.,’On Approval’)]//a
You can get XPath on a page in a browser by pressing F12, on a Mac – cmd+opt+I/J, then select the desired item on the page, right-click View code, then you copy the selected code in XPath format.
2) CSS is a language for describing the rendering of structured documents (such as HTML and XML) on screen or paper. It is a more convenient and frequently used selector.
3) Text – a simplified version of the above options. You just need to select text on a specified page
Coordinates – the point of this item is emulating a mouse click on specified coordinates. Coordinates can be easily found using a simple extension for Chrome and install it according to our instructions.
Coordinates – the essence of this element is to emulate a mouse click on the specified coordinates. Coordinates can be easily found using a simple extension for chrome.
This is the “last resort” way. When it is almost impossible to make a selector. For very heavy sites. Some sites completely change their structure every time they are updated, in order to protect them from automations. This method is suitable for these cases.
2 . Mouse movement. Works according to the same scheme as the coordinates.
3. Scroll. Imitates mouse scrolling on the page to a certain coordinate (you can’t specify scrolling speed yet).
Keyboard Unit
Similar to the mouse, you can enter any text, press a key, and the robot will do it for you. The main thing is to set the initial parameters. For example, you need to enter the username / password of your account. You give the bot the parameters it enters, and it does it for you.
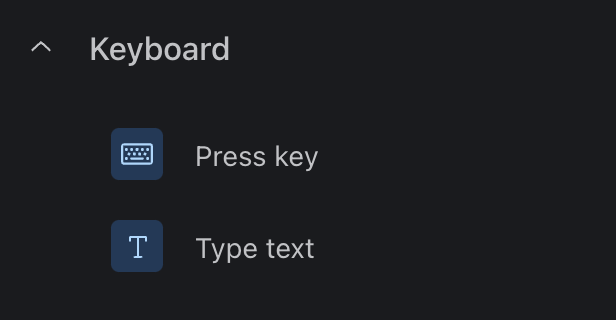
- Press the key. Here you must specify the key to press in the braided area.
- Print text. Specify the text that you want to print in the braided area.
This block supports a changeable resource, more details about it were written above.
The combination of keys, you can specify only from the available list.
Block Data
Data is probably the most important block, the one that is at the forefront of all functionality.
Most of your actions in the browser entail interacting with certain data on the web page. For example, you want to save data from all of your cards, and later substitute it for each account. Or you want to download the creatives in an ad campaign from a specific folder on your computer. Or you want to download a funny meme and send it to your grandmother. You can specify a folder from which the creatives should be picked up and uploaded to each of your ad accounts – this can be automated through the script builder.
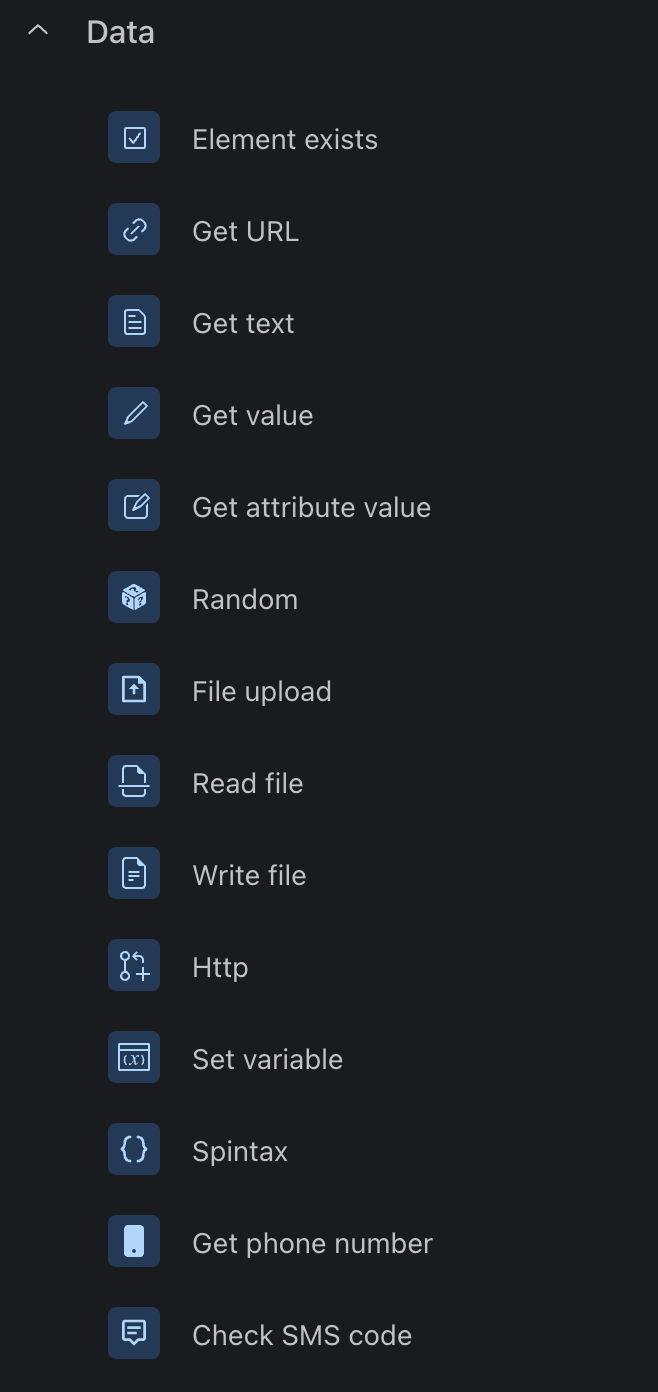
- The element exists. This component uses the selector principle as specified in the click.
- Get the URL. The URL is written to a variable and then it can be saved, for example, to a file.
- Get the text. In simple words, this function copies the text from the specified area and creates a variable for it, by which you can later insert the text into “Print Text” or any other similar function.
- Get the value of the value attribute. In this function, we can get the value from the site exactly value. The function selects the first row with the <value attribute and writes it to a variable.
- Get the attribute value. You can specify any attribute here. This option is more suitable for coders. html has attributes: <div class=”abcd”>text element</div> class is an attribute, and abcd is its value.
- Random. Creates random text (email, full name, random letters, password, first name, last name, number) in the specified field. For example, the random “Print text”.
- Uploading files. This function allows you to upload a file to a website, for example, an avatar. Important! You need to find the input element with the file type (<input type=”file” />) and copy it in XPath format (for example). It might look like this //*[@id=”add_files_btn”].
- Read the file. Reads a file from the hard disk. This is necessary in order to pull the text from the file on the PC and paste it on some website.
- File recording. Saves data from the specified variable to the file you selected. For example, you can get the text from the page by specifying XPath and creating a File Record variable for it (specify the Path to the file to which the record will go, the TXT file format and select the recording mode.So far, only text formats are available: TXT, CSV, JSON. But soon we will see the rest.
- Http. Creates requests, for example, you can integrate with Telegram, SMS service, or change the ip on mobile proxies.Create a variable. Creates a variable and assigns a value to it.
- Create a variable. Creates a variable and assigns a value to it. Also, when creating another variable with the same name, you can change its value.
- Spintax is a text syntax that looks like this:
{Hello|Good afternoon}! I hope you are in a {good|excellent} mood! {{Thank you and|Wish} a wonderful day|Good luck|Bye}!It is used to create a random text from a set of variants. For example, the spintax above can generate the following text: “Good afternoon! I hope you are in a great mood! I wish you a wonderful day!” and it will be different every time, with 16 possible variations. - Get a picture in base64. It is designed to save images in a text format of the form YWJjZGVm….. (this is an example of base64), mainly used in automatic captcha solution to transfer captcha images to the captcha solution service, at the specified coordinates. You need to create a variable in which this action will be recorded (necessary for further work).
- Get a phone number — used together with the Check SMS Code function, creates a phone number through the service which will then receive an SMS code to confirm your identity on the site.
- Check the SMS code. Getting the code to the number created in the “Get phone number” function. You need to specify an access token from the site. We recommend waiting at least 20 seconds before checking the code (setting a Pause) so that it has time to arrive. And also check the code no more than once every 5 seconds to avoid blocking on the site.
- Solve the captcha. The bot passes the captcha for you. You use the variable that you received after creating the “Get a picture in base64” function, create the “Solution” variable, then we output the actions to the captcha text input field and set the “Print Text” function.
Important! You must be registered and have funds in the account on the site, without this function will not work. On this site you will receive a token of access it you already insert in the advising field “Anticaptcha: online service for recognition, bypassing and automatic solution of captcha Rucaptcha.com token”.
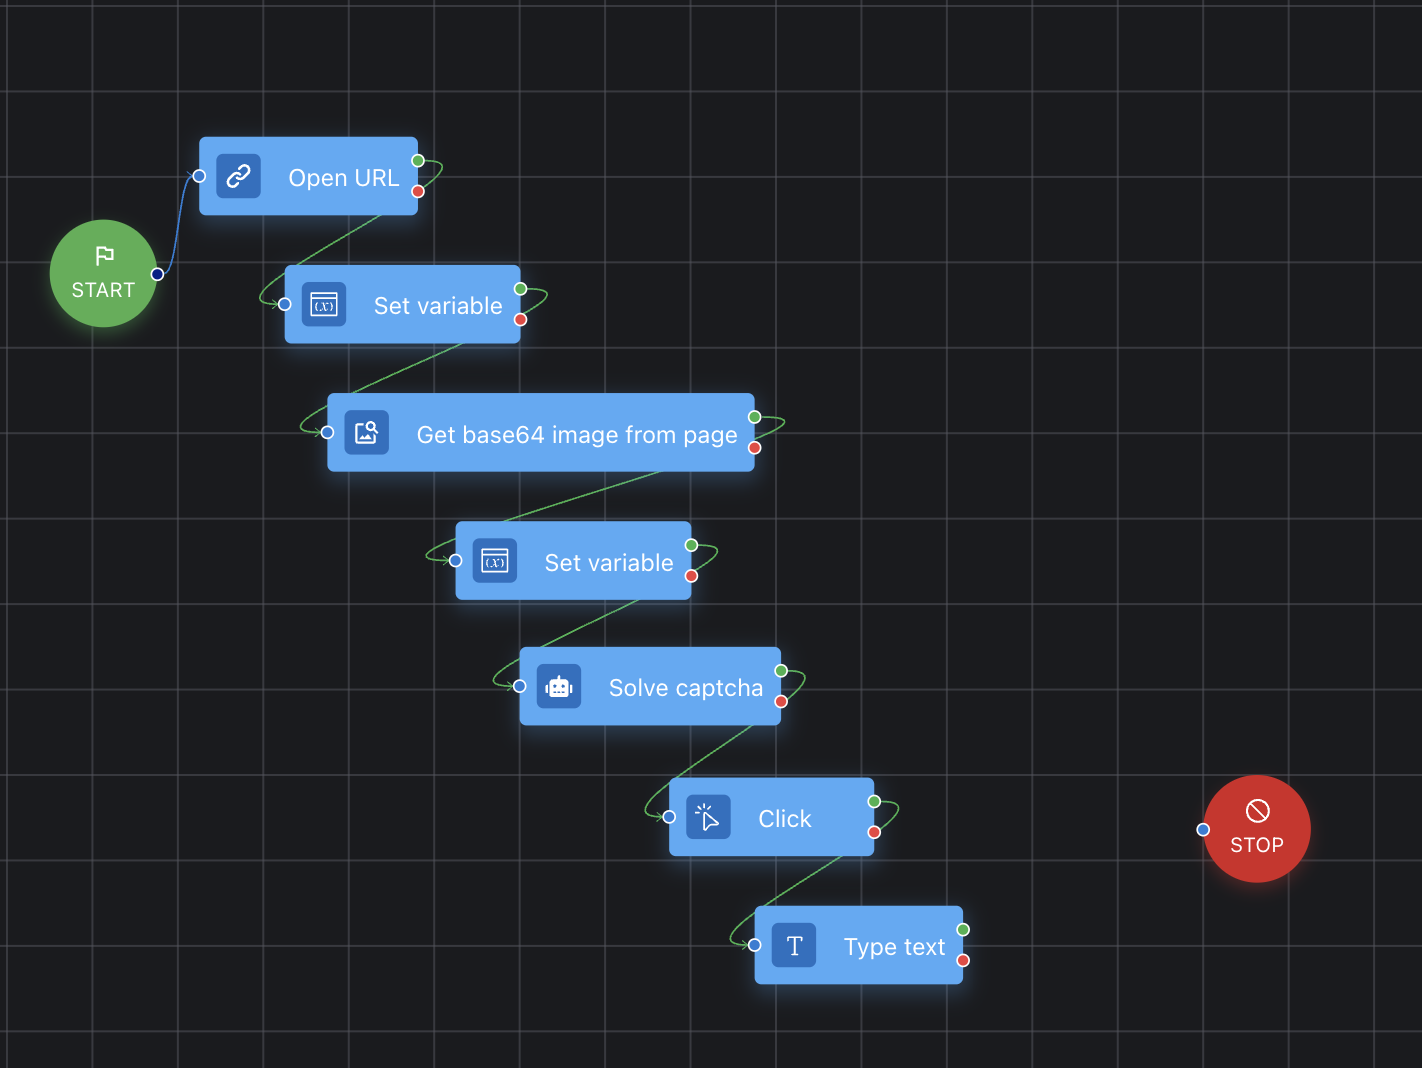
An example of a script to solve the captcha on the site
*Blocks 3, 7, 8, 9, 11, 12, 14, 15, 16 support a variable resource, more about it we wrote above.
Dolphin{anty} Block
This block is designed to interact with Dolphin{anty} functions from outside the profile.
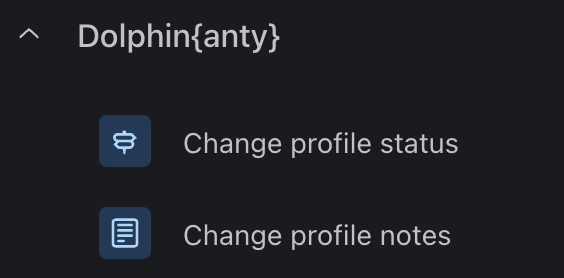
- Profile Status. Sets the status on the browser profile, you can set at any stage. For example, after pouring or performing the desired action completely, you can specify the status “Done”.
- Profile Notes. Sets notes on the browser profile. Can be set at any stage. For example, before you start farming, you can specify the note “FB account login and password.
Block Other
This block contains functions that were not included in the previous segments. You can add certain cycles of data processing, or randomize the bot’s actions (add pauses and more) to make your script as similar to a real user as possible.

- Pause. Creates a delay before executing the next block, simulating the choice of a real user. For example, you need to wait for the button to appear on the page, or you need to wait for the site to send an SMS code.
- Condition. If the specified condition is True, then the action follows the green thread. If False— red. For example, you need to find instagram pages that post a lot of posts. In this case, after you count the number of photos on the page in the script, create a “Condition” block with the following condition:
The number of photos > 5If the value of the variable number of photos is more than five (6, 10, 49), then the script will follow the green thread.If the value of the variable number of photos is less than or equal to five (1, 4, 5, -20), then the script will follow the red thread.
- Execution. With this function you can enter any JS code and it will execute.
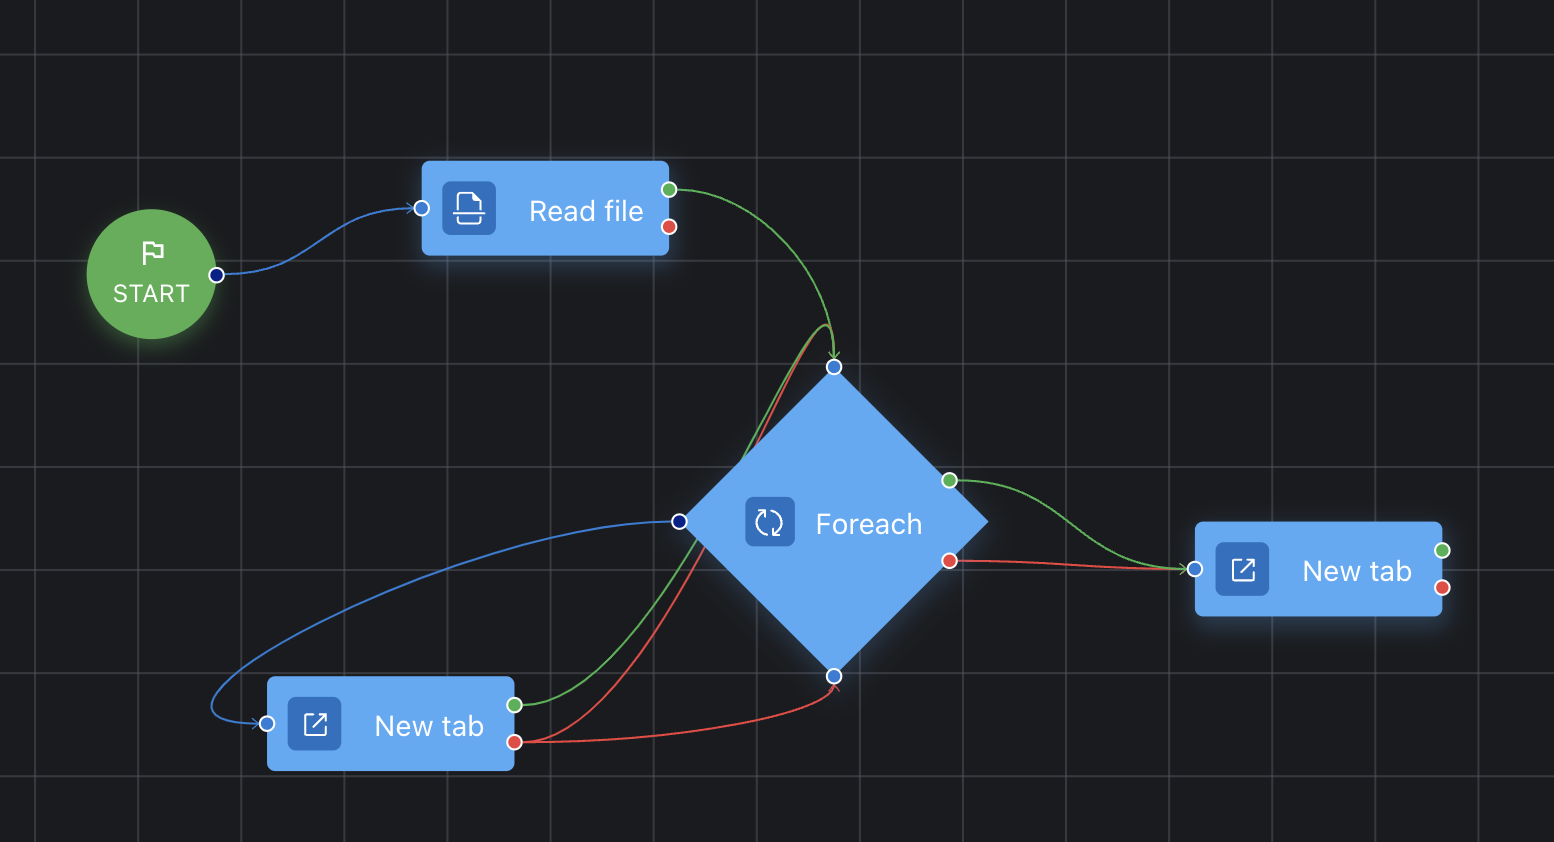
- Foreach loop. Executed for each element of the array (the array can only be retrieved in the “Read file” function).
For example: The file contains 3 search queries, we need to open 3 Google tabs and search for data from the file.
In “Read file” we specify the file with the data by rows:
1
2
3
In the loop, we specify the output variable from “Read file” and create a variable for one element, for example, element. In the “New tab” action, we specify https://google.com?q=${element}, where ?q=${element} is the use of the one element variable specified in the loop. To exit the loop we specify 2 paths in 1 action (so far it works this way) and continue any action you want. In “Read file” the use of strings in this case, starts from the end of the text.
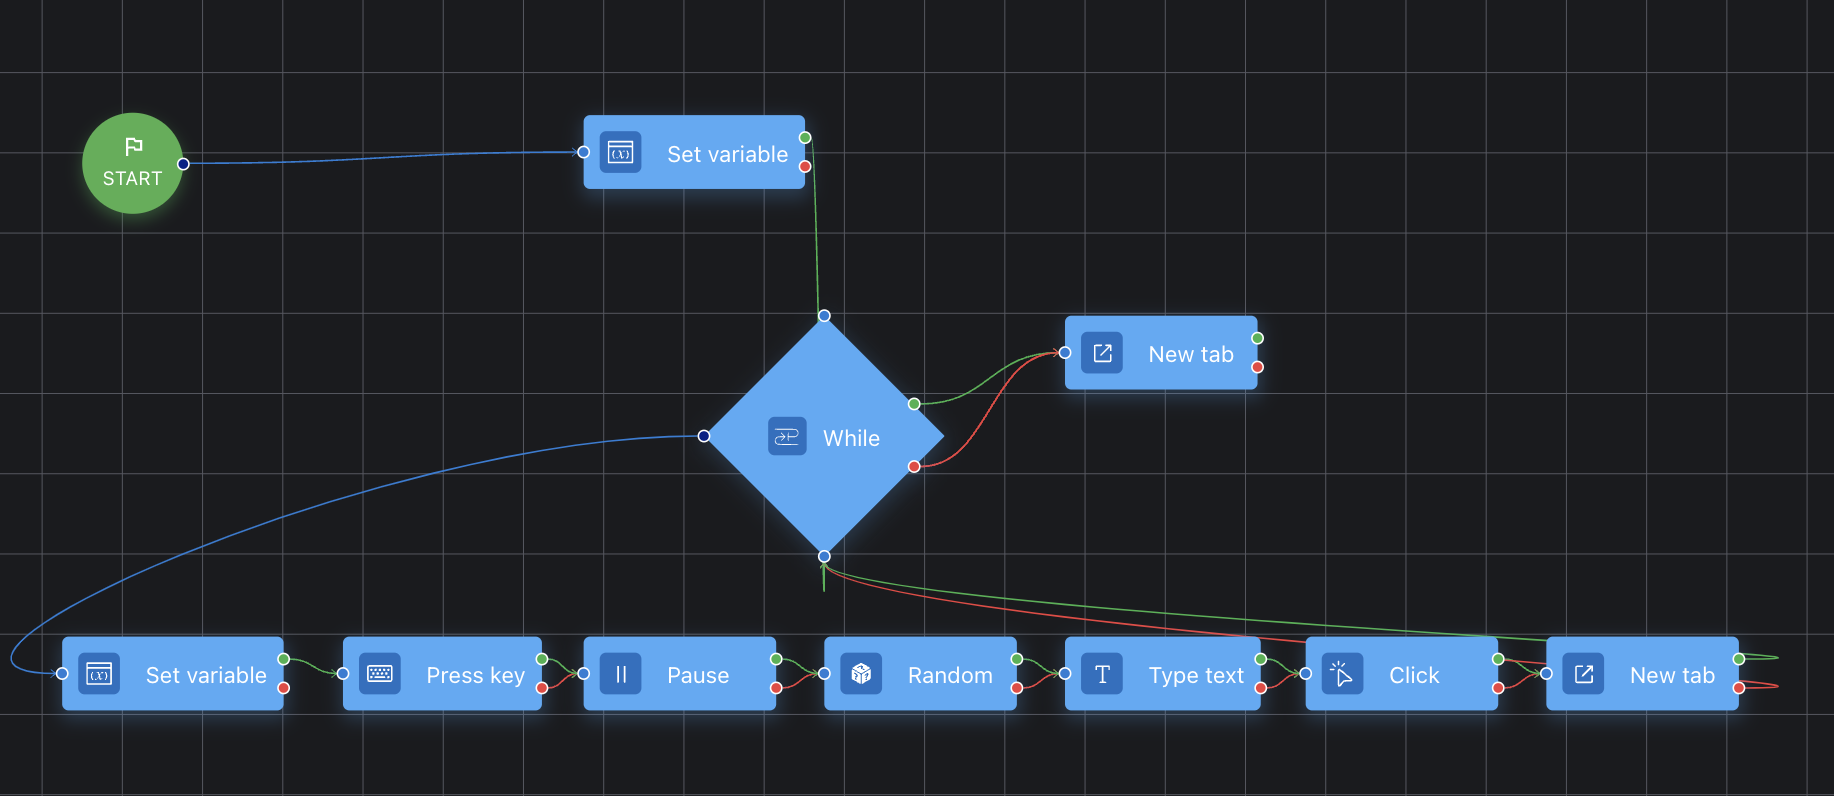
Cycle While checks the condition before each iteration. If the condition is met, the event runs on the red thread, if not it runs on the green thread. For example, you need to open 4 separate but identical tabs to farm and find random data in them, such as names. When finished, it will exit the loop and continue the specified actions further. In the loop (example) we specified:
Variable: per1 (the one we specified in “Create Variable” before the loop)
Operator: < (the action will be executed until the variable is < the value you specify)
Variable or value: 5 (any value, taking into consideration that in this case the check will reach 5, since 5 cannot be < 5, which means it will execute 4 iterations of the loop)
Next you specify any actions to perform the task in the screenshot:
New tab – https://www.google.com/
Click – XPath //*[@id=”APjFqb”] (field selector to search)
Type text – ${text} (what is specified in Random)
Random – Name – English – Output variable “text”
Pause – 2000
Next, press “Enter” and create a variable – name the same as in the variable before the loop, set: value 1, operator + (increase the value in the loop after each pass).
You can specify any exit from the loop. We have specified “New Tab”.
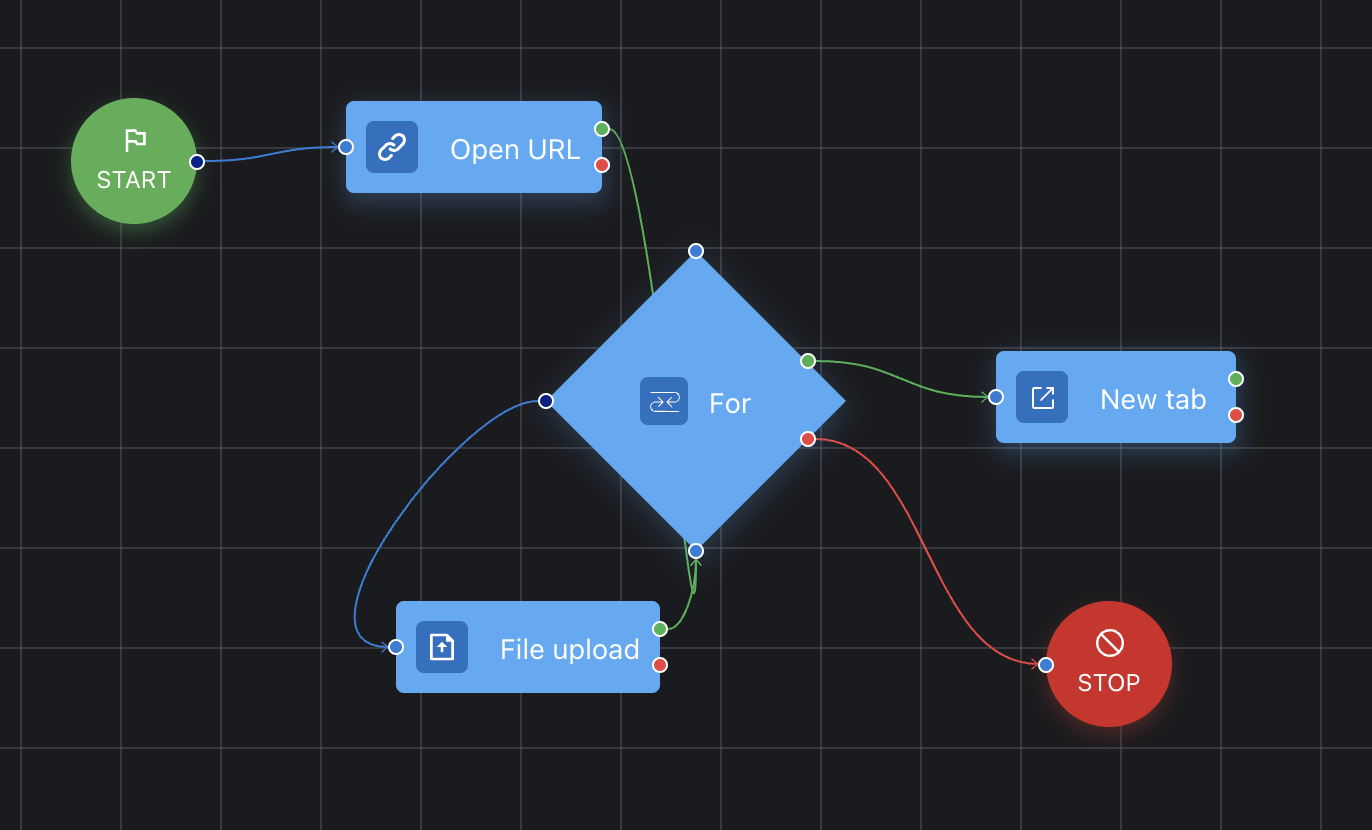
- The For loop checks the condition before each iteration, it is executed as many times as necessary, for example, 5 times in a row. That is, in the loop itself you need to set the value from 1 to 5 and then loop the action itself Load file and specify the output of the loop for further actions.
- The “Add Comment” function creates a comment box on the workspace that you can specify next to the action you want.
- “Stop” closes the browser profile after all the specified actions have been taken. For “Stop” you need to set “Red Thread”.
Scenario Builder usage options
Web Scraping
You can use the script builder to automate the process of retrieving data from websites by writing scripts to navigate through web pages and retrieve the information you need.
Social media automation
You can also use the script builder to automate social media tasks. You can automate tasks such as posting content, liking and commenting on posts, tracking users, and messaging.
E-commerce automation
With Script Builder, you can automate routine tasks such as adding items to cart, completing checkout, or tracking order status.
Automating Selenium testing
Selenium is a popular test automation system. By using the Selenium Test Script Builder you can save time and reduce the risk of errors that may occur during manual testing.
Script Builder allows you to automate the entire testing process, including navigation on web pages, interaction with form elements and checking that the website or web application is functioning correctly. With this automation, you can run tests more frequently and with greater accuracy, ensuring that web applications always perform as expected.
COINLIST Automation
Script Builder can also be used to automate tasks on COINLIST, a popular cryptocurrency exchange platform. You can automate tasks such as logging in, viewing balances, making transactions, and monitoring market prices.
To summarize
Now you know how to use the Scenario Builder and can apply it to your work. Using our tip, you will easily be able to learn this tool and delegate some of your tasks to a robot.
💜 Your Dolphin{anty}